Saturday 10 December 2016

Crocheted snowflake earrings

There is much happening outside as Xmas arrives. Lots of hustle bustle in the shops, on the road, in the school too and everywhere. For me, if its to say, its like a busy family since last few weeks. A very busy husband with his office work, some travelling too, now hard working just before the Xmas shutdown. So needless to say, all the household responsibilities on my shoulder. Sometimes I enjoy it, sometimes it takes my breathe away, managing three little ones in this very cold weather, waking them up in the morning when they are cuddling inside the warm duvet(feel so sorry for them, but no way until holidays), up and down to/from school, cooking, feeding (ahhh, the most difficult task, I should say for me, don't know about others), doing dishes, teaching them and finally putting them to bed. All happens monotonously. Sometimes feel like watching a black & white  art film. All the same. But in spite of all these, if something comes to my rescue is the crochet. I feel relaxed as I see my yarns n hooks.Oh there, did I forget to mention, I have joined a teaching course too. So its a big rush. I wonder sometimes what would I have been if I hadn't found myself out to crochet.
 
crochet snowflake earringsA small amount of time dedicated to my yarn and hook gives me that unexplainable pleasure, as if all my pains disappear and I get a very good night sleep, which ultimately as everyone desires. This week my post is about the snowflakes earrings I managed to make in between my rush. I couldn't think of a pattern of my own. So I borrowed Lucy's pattern. That was so well explained as always she does.
 
I wanted to make snowflake ornaments for our Xmas tree, as kids love to hang this and that. But then I felt how it would be if its a jewellery. So thought to make an earring out of the pattern. Since the thread was so thin, I chose 1mm hook. The thread being so fiddly to handle, it took sometime to finish off with the second round and then proceed to third round. However, it came out well. I also added tassel as I love danglers much and finally finished off with the findings. Excuse me for the poor lighting as it was taken on a rainy day with  maximum day light available. After I finished it, I gave a light press to the earrings as it was curly at the points and the tassels too. And finally an earring was born  that day. Its really so pretty that I would love to wear it. Its so light that we don't feel that we have wore an earring. Only if the tassels tickle on your neck, may be you feel it.
 
How are things at your end? Hope you all will have a lovely weekend and good Xmas shopping. Its time for me to have a good cup of coffee. So see you soon in my next post. Byeeeee... Happy weekend and happy crocheting.

Sunday 4 December 2016

White bud crocheted prayer shawl

Christmas is round the corner and so is the mood to crochet new stuff - maybe its hanging ornaments, bunting, coasters, placemats and what not, isn't it? This time I wanted to try something new that I haven't dared to do so - its a prayer shawl. For that I had to do a study, what does that literally mean.
 
 thought it is a shawl that the ladies drape over their shoulders when they go to church for attending mass. But I wasn't so sure of that as I had just watched in films. But I learnt that its for various purposes - keeping one in prayers, praying for recovery from illnesses etc. But this for me, I crocheted keeping in mind my first reason.
 
I crocheted it using 100% cotton yarn and a hook size of 6mm. I think even if it was 6.5mm, it would be easy to use. It consumed one full ball of white yarn and few yards from the second ball for tassels. I didn't follow any pattern as such. It flashed in my mind as my work progressed, tried it out and trust me, it was easy to crochet this. Just chainless single crochet, chains and some picots to form the bud shape. Once you get the hang of it, it is easy to continue and you want it to get finished off to see how it looks like. Finally a round of single crochet to give a defined look. Its 40" * 30"(along drape side) * 14" (from the middle to the tip of the shawl). I could do it in a week with couple of hours each day. Showcasing a couple of its photos.
 
White rosebud crocheted prayer shawl

White rosebud crocheted prayer shawl
 
 
Maybe this is one of those projects which I have wanted to finish off in time. I liked the way it hangs from the chair. It was so cozy to wear it around the shoulder. Hope you liked it. Love to hear from you. Until then its Kala signing off. Have a lovely week ahead and happy crocheting.

Friday 25 November 2016

Marine themed granny square cushion cover

Hello there everyone. Today is a post about a granny square cushion cover. It took about six months time to post this, apologies for that. Though I had finished off earlier, the fact is I almost had forgotten about this. I completed this project when I was about to travel to India in the last summer vacation. It was almost a rush and I couldn't find time to post it at that time. But glad that I had drafted this project as well as few other projects in my blogger dashboard, so that came to my rescue. I can pull out one by one to post about it. So now it is time for describing about my marine themed granny square cushion cover :-).
 
When I was thinking of what theme could be applied for the second cushion cover (earlier one was a multi coloured one), I was in a dilemma. The pattern of course was to use granny square, but the choice of colours put me to trouble. Then I remembered that my brother's favourite colour is blue. So why not add a touch of blue to its maximum. And to second my thought, I saw an ad in between watching a movie. It showed some island and touches of blue and aqua here and there. Something in my mind sparked immediately to use patches of blues on one side and other side with a different appearance.
 
Yes, that's it. Having finalised on the colours and patterns, I started digging out all the blue coloured yarns that I had in my hand. Being it a granny pattern, I was sure it will not affect me watching the movie either. So crocheting a marine themed granny square cushion cover began to evolve.  
 
granny square crochet cushion cover
For the patches of blue, I didn't design much. Just kept in mind that dark and light blues should alternate or overlap to produce sort of good gradient effect. I started crocheting the squares and followed the JAYGO (join as you go) method to connect each squares, which is absolutely a good time saver, and sometimes I weave in my ends in this process. I hardly remember spending time weaving ends. So this pattern was for one side.  
 
granny square crochet cushion coverThe other side also followed granny square pattern with only two blue colours, but it is a diagonal granny square pattern. I learnt a new pattern in that way and you know what, this diagonal pattern took considerably less time. I could crochet it easily, maybe I got the hang of it and it went on flowing easily, just changing the sides. It was really fun crocheting this pattern. See how the pattern grows from the centre to the corners. I have marked this pattern for making a cushion cover for myself anyway. I think we can add two more colours, in total having four to give much more effect. I don't know. Need to try.

This time I didn't use any single crochet stitches for the border and then any FLO or BLO or whip stitch techniques to join the cushion covers. I just used JAYGO technique here. So again a time saver here that the three sides were joined as I crocheted along each side. Only the top was left open to insert or remove the cushion. I added buttons again for this cover, some blacks and blues to match with the colours. And finally, a cushion cover had evolved. I really liked how it turned out at the end. It was really awesome.
 
With two cushions (Granny square cushion cover -1, the post here) side by side, my sofa was looking great. Hubby and kids loved it. My big boy commented if I am planning to turn everything in our home to have a crochet touch. Yeah, he is right to an extent. I would love to do so if time permits, I said.
 
So that's all for this time dearies. I hope you enjoy reading my posts and would like this too. See you in the next one, until then its bye from Kala. Have a lovely weekend. And if there are any crocheters or would love to learn crochet, HAPPY CROCHETING. 

Saturday 19 November 2016

Spiral earrings

This week in  my blog is about the spiral pattern. I wanted to learn this somewhere last year, but it went delayed and in course of time, forgot about that. Last week, when my boy M was describing something about a lego creation he made, he mentioned something about spiral steps or ladder he wanted to build in it. At that time, I thought I too had wanted to learn something similar in crochet and recalled it was this spiral pattern. I felt I should have noted this somewhere in my jotter, but hadn’t.
 
Crochet spiral earringsI took some time to understand this pattern. The pattern is straight forward, but handling the yarns were bit difficult for me. But you know what, if you can place the yarns on either side unwinding a long working yarn, to an extent this difficulty can be solved.
 
So now that I have learnt this pattern, it prompted me to make earrings and within no time, I had my own set of earrings. It turned out to be so crisp and cute earrings. I liked it very much. But sad that I am not able to wear it outside as it is so cold, icy, rainy and sometimes snowy that I have to get tucked in the jerkin. But I didn't give up. I wear it at home (hahaha).
 
My ladybird liked the earrings, and she wanted to wear it. I will make it for her when she grows up. Wait my dear, until then.
 
Hope you liked this small creation. See you in another post, until then its bye from Kala.

Wednesday 9 November 2016

Happy First Birthday Yarnoments and Give away!!!

Yes... Its one year since I launched my Yarnoments. I feel so happy for this moment. Of course, without God's grace and support from my dear and near, I won't be able to reach this far, that is for sure. Ohhh, getting emotional here...... Also, I see that day by day , visits to my blog is also increasing which motivates me to explore more and more about crochet.

I organised a give away to celebrate this. Decided to choose three lucky winners from my WhatsApp group. Kids were also so enthusiastic as me. Luckily they were having vacation, so I got some more time to continue with the finishing touches for the give away. Also, this is my first experience too. I wasn't so sure of how to do this. But in the end, everything went well. I asked my kids to pickup three winners from the lot of names. My ladybird wasn't sure what to do. She was picking up name after name (hahahahaha)  and then putting back all the papers in the bowl. Continued this for a couple of times. I then asked my older one to show what to do and tiny tots followed him.

Don't you want to know what was the give away??? I crocheted three purses for the winners made out of bulky yarn. Added a flower applique too. My friends liked the idea and the gifts. I am so happy to read it too.
 

Crochet purse


I was planning to upload this post a couple of weeks ago, but my ladybird fell ill and as she was recovering, she developed ear ache as the aftermath of her illness. Then the school reopened and I was held up with my routine tasks as well. I almost lost the track. Excuse me for that, (I am sure my readers would do that, thank you so much). However, I didn't sit idle these days. Tried to snatch some time in between the schedule to learn new a couple of new things about crocheting a curtain, a new stitch, made couple of earrings, worked out on cushion cover (continuing that, these are the pending ones that I had to give it to my brother) etc. Shall soon post about it.
 
See you soon in my next post, until Kala signing off for the day.

Sunday 16 October 2016

Self gifted crochet travel case

Doesn't that title seem to be weird?? But I don't. Because, this is an unexpected, unplanned gift that I presented to myself on my birthday two days back.
 
Two weeks ago when my kids went out with their dad for weekend shopping to buy groceries, they bought a cute cylindrical case of sweets. They were so happy that their dad bought it for them as both of us don't show much interest in buying sweets. We don't like their little teeth get harmed. But once in a while we do buy them some. When they came back home and showed it to me, though I was crossed at first, I was also happy to see their joy they put on their faces and joined them in their happiness.
 
I then asked them what they were going to do with the case. Each came up with their own ideas, Boy M said he will make a rocket out of it, Little V said he will make submarine, (wowwww, that's an awesome thought for his age, I felt. But he said he would definitely ask for his big brother's help. That is anyway expected, hahahahaha). My ladybird obviously had no choice other than copying her brothers. so she said she will make both of them. Permitted.
 
Crochet travel caseLater, I saw in their playroom the sweet case lying on the floor ignored. I asked them if they are not making any of their ideas to which they paid least attention. I then confirmed if they are not using it, then I might want to. Little V asked me what was my idea. I came up with my thought of using the case to put my crochet essentials while travelling. Kids liked my idea and immediately gave it to me for my purpose. Aaahhh, kids are so generous, aren't they????
 

Crochet travel case
I took some time to crochet a case cover wherein I can put my essential crochet accessories while travelling or waiting to pickup my kids until they finish off their school club sessions. To add details, I crocheted a multi layered two toned flower also. I crocheted a lid cover too and stuck it to the case lid. My cute crochet case cover is ready to use. You know how handy it is when you put it in your handbag or the crochet bag itself. You just need to take that case alone where you can find your crochet hook(s), tiny pair of scissors, tape, stitch marker, a couple of buttons, or beads etc. Thanks to my kids and hubby that they bought this. I have been looking for such a handy case while travelling when I don't need to take my entire box or just scatter it in my bag.
 
What a lovely gift I got !!! You know something. You can use it as kids' pencil case, or put agarbathis in the pooja room, or use it as a corner designer in your living room or hall with a couple of artificial flowers in it,  makeup brushes (kit).Options are endless. Tell me what would you like to use it as. Love to hear from you. Until then, bye from Kala.

Saturday 8 October 2016

Crochet cover for an almost to recycle travel clock


crochet travel clock cover table clock cover timepiece cover
Coming up with a sudden thought, attempting it and the outcome becoming too awesome accompanied by much appreciation makes one person so happy that words become too short to express it. Wondering why I am saying this?? Yes, because it was me who came across the same situation yesterday when I showed my family this cute little crocheted cover for a travel clock which was somewhere lying in the house unused for past three years. See, how a plain travel clock is transformed ..... isn't it adorable ????

The situation arose when I very badly needed a wall clock for our bedroom upstairs in the new house in Leeds. Every time while shopping, I forget to buy one. So in order to avoid that, I amended it in the shopping list too, but unfortunately, I fail to take that list with me and as usual, I don't buy any clock. I then felt like buying a clock is not destined.


Yesterday morning, I decided I should at least do a temporary fix to this. Guess what??? Yeah, this little travel clock came to my rescue. I thought of replacing the wall clock in kitchen with a travel clock which has been unused for past three years, see the left side picture (almost at the verge of recycling in Glasgow, thinking it won't work). I had bought it from 99p in London which I had always visited in the beginning. Suddenly, an idea flashed in my mind, why not I crochet a cover for it. I didn't wait much longer. Grabbed some random colours of yarn and hook and started crocheting it. My sweetie pie also was feeling sleepy (good opportunity, hahahaha). She cuddled down by my side and I started concentrating on my work.   
crochet travel clock cover table clock cover timepiece cover
 
I didn't have any clear idea of what to do. I started with the foundation chain and did single crochet stitches. All it happened in a jiffy that I was so surprised, hey what's going on ??? So I said to myself- no hurry, please slow down. Some instinct in me was saying to look into the work closely. It was turning out to be a bracelet type or bangle. No, that is not what I want, how did it happen? Then I realised, I forgot to make corners.
 
How can a square travel clock have no sides??? That's ridiculous. I unravelled the stitches, added an extra sc in the every corner in the foundation chain, counting exact stitches. When I finished my second row, it was taking the shape of a rigid square. I continued with it, alternating colours until it met its desired measurement. Then I felt why not I cover the area at the back just above the buttons and the battery cover.
 
 
crochet travel clock cover table clock cover timepiece cover
Yes, that sounded good. So I worked on it too and it turned out to be a good sturdy cover. Of course, the sc itself gives a tight stitch pattern. I used a hook size lesser too for the back cover. So it was obviously tight enough for the cover. The picture on the left side shows the back side.

It was a bit difficult for me to crochet back panel, fiddling with the yarns maybe. However, interesting too. I couldn't wait to finish off the cover to see how it would look in that tiny timepiece.

I feel it should get a more definition, too reddish, isn't it??? But that's ok, it kind of blend with other colours. I am so happy with the unexpected outcome.


crochet travel clock cover table clock cover timepiece coverI just wanted to place it in the corner shelf, but it was too small to see the dial from a long distance. So I had to hang it. And eventually it turned to be a cute little hanging too. I threaded the same colour yarns in a big eyed pony needle, found out the centre leaving required stitches along the sides on the top, leaving desired length to hang, knotted on the top AND..... made a hanging item out of it.  
 
Ohhhh, I really loved it. How an unused item is transformed into a cute, adorable wall hanging within no time. Indeed an upcycling, isn't it??? This is how it sits on the wall of corner shelf in the kitchen. And the advantage is that it doesn't take much space. I can grab things from or place things on the shelf easily. Earlier it was really difficult and no space with a round wall clock. (And that too had a crocheted cover around it. I shall show it along with my two others later). But now, it isn't. Aweee, how elegant it is!!! You also should give a try. I have one more of the same travel clock, don't know where I have put it away. But I am now sure that I will make one more cover for that too once I find it. Again, a reason to crochet. May be will add more details to it.

I couldn't wait for showing it to everyone. In the evening, when the little men returned home, I showed them my new creation. They were taken aback seeing that. Maybe this was its destiny. My sweetie pie took it in her little hands holding it like a precious gem. She might have understood the value of it, and the effort her mum has put to make a cover. My hubby was amazed to see this cute little thing hanging in the corner shelf. (Ssssshhhh, I don't know if he is expecting similar things from me, wink). I know this isn't any new invention. Several others are there who come up with brilliant ideas, but for me what I do is boundless.
 
Do you want to know some more ideas on this. I came across of using it as a wall hanging, kids room décor (wall hanging in their room), study table piece, window sill piece, as a gift to your friend on moving to a new house, a birthday gift to kids, if you are travelling in scooter, you can stick it in the handle bar too (a wild thought, you don't have to divert your attention to see the watch in your hand though. sounds funny isn't it, but worth a try though). Wowww, amazing ideas, aren't they?? What do you think ?
 
Please leave your suggestions in the comment box below. See you in the next blog, until then its bye from Kala.

Monday 3 October 2016

Crocheted multi-coloured butterfly keychain

Hi there lovelies, good to see you all after a long time. Settling down in Leeds took considerably more time than I expected.
 
Getting admission in school was the main overhead, but luckily, though I have to walk almost two hours a day, (yeah, pick up and drop is my responsibility), kids got admission in a good school. Other problem I faced was the intermittent access to internet. There was some problem with underground wiring which the BT person very lately detected. So it caused some delay in my addressing to the blogland.
 
You know what, after moving to Leeds, I felt like time is too short for me to do anything. I couldn't spend much time with my crochet work. I feel so guilty for that.  Is it because of the new place or kids are becoming bigger and they have new demands everyday, I had to meet it or I get tired walking up and down two hours a day, there are a couple of small steeps, so pushing the pram with little girl is tedious for me.  I don't know. Maybe it will be resolved in course of time, I feel.

However, I managed to help myself with learning a couple of new stitches and designing couple of dresses. I am so happy that even though I could spare very little time with crochet, I was able to do something which had given me confidence in designing dresses, identify mistakes, provide room for improving my skills etc.

Now coming back to the routine, today's post is about a multi-coloured butterfly keychain.

Crochet butterfly keychain
 
I liked this very much in this variegated colours. so apt for a butterfly to be. Its some time back I had made this which I misplaced somewhere at home. While shifting the house, I happened to see my old creations. I relived those moments when I was struggling to learn basic stitches and make some crochet cuties....
 
And guess what, I came across a bag which I first learned to make from youtube. It was half way done as I ran out of the yarn and suspended the work until I bought a new one. But eventually, I forgot about that. Now that is in my to-do list. I shall post on it sooner. I have a draft of posts which I have to and I don't forget about it. May I request you all to share your comments about my creations. I love to hear from you. Also please share your creations too. Love to see yours. So until then, its Kala saying bye, have a great week ahead.

Monday 29 August 2016

DIY - Necklace/jewellery display stand

Good morning everyone. Today's post is different from usual crochet stuff. Its about my necklace / jewellery display stand which I made for my first exhibition happened in the summer in my kids' school. I have promised to post about this, but I was away on vacation and I couldn't do so then.

This is the display stand that I made. It showcased very well my jewelleries in the exhibition. I can't claim this as my own idea as I got influenced by a couple of youtube videos, but I made few variations to that as I didn't have much of the essentials in hand then. But I can assure that this will add charm to your own dressing up table or for the exhibition purposes.


I am sharing my idea here, if in case it is useful for you. Please don't be afraid seeing the lengthy post. Its a step by step procedure that I have explained here. You can make it in a single evening time.

Essentials:

Card board of dimensions 10"*7".
White paper
Pencil / pen, eraser
Ruler
Colour paper / gift wrap cover of dimensions 11"* 8"
Glue
Punching machine (single punch or double punch)
Thick thread / yarn
Scissors

Method:

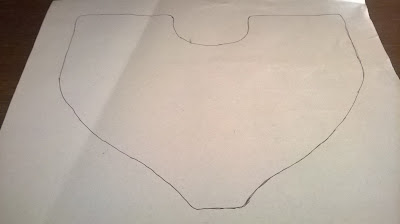
1. In the white paper, draw a U neck shape as below or any shape you prefer. This is my U neck shape.

DIY - Necklace/jewellery display stand

2. Cut it along the drawing so that you get the shape of the U neck. Place it on the cardboard and trace it in the card board.

3. Cut the cardboard according to the design.

4. Place the colour paper / gift wrap paper on the top of the cardboard neck to check for the proper fit.

5. Using glue, stick the paper on the cardboard and trim of excess paper.

6. Its time to mark holes using pen / pencil. So using ruler, measure the width of left side of the U neck. Now make 4 or 5 holes according to the width in the left side. I made 4 holes.

7. Now using the punching machine make holes to the left side of the U neck on the top of the holes you drew using pencil.

8. Repeat the same process (6 &7) for the right side. You will get your U neck as in the picture below.


DIY - Necklace/jewellery display stand

9. This is the neck shape I have obtained so far. Yours will be different if you have designed a different one., but overall process will be the same if you have followed these instructions.

DIY - Necklace/jewellery display stand

10. Now its time to thread or yarn through the holes.  For that , fold the neck by placing right side on top of left or vice versa in such a way that the holes overlap on top of the other, so that you see a single hole. If there is a minor difference between the distances of the holes you made, you can ignore it.

11. Pull in and out the yarn alternatively through the holes. I pulled out the yarn from the inside of the first hole of U neck to outside, pulled in through the second hole to the inside alternating until I reach the last hole. So you will get the thread/yarn seen outside as in the picture below.

DIY - Necklace/jewellery display stand

12.In the inside of the neck, tie a knot so secure it as in the following picture.

DIY - Necklace/jewellery display stand

13. Ta-daaaahhhh !!! Your necklace / jewellery display stand is ready to use. This is the front view.

DIY - Necklace/jewellery display stand

You can showcase your jewellery on the stand in your dressing table or any where.


DIY - Necklace/jewellery display stand

Tips:

1. You can draw it in the cardboard itself, if you want to. In that way, you can save time.

2. Make sure that the holes are placed in correct spacing on either side of the neck.

3. You can cover the neck shape in two different colours - one at the front and one at the back for a variety look (see my step by step pictures) or use the same colour on both sides, its up to your wish.

4. The advantage of this is that you can either stack it or unfold it, make it flat and place it in your suitcase as you place your notebooks one top the other.

5. To add more chic look, you can cover the top and bottom of the neck, but in that case you wont be able to stack or unfold it.

I hope you enjoyed reading my post. If you ever make one, please post your picture. I would love to see it. Please leave your comments as always. Until then, its bye from Kala.

Note: I am relocating to Leeds, so please expect a delay in my posts for next couple of weeks.

Sunday 21 August 2016

Floral earrings

It was so grey and rainy yesterday. I sat down on my sofa after the household chores wondering what can be done. I started learning something new in crochet, but continuous working on it bored me. Seeing the same colour for some time had almost put me to sleep. The climate was also favourable. No no no... I don't want to sleep. Then I thought of making something easy, but diverting. So earrings came to my rescue. I made two pairs of earrings on a single go which was unintentional, but it was so addictive.
 
This was the first one I made out of yellow crochet cotton thread and 1.75mm hook. I didn't have much idea that I foresaw to make. It happened so. I loved the colour combo - yellow and pink. Oh I really loved the outcome. I didn't need to iron it as it was stiff by itself. I just needed to try it on. The rhinestones as well as the pink beads go well with each other.
 
Crochet earrings

I didn't follow any pattern for these two, so I can claim its my version, but net provides more options. However, the second one I made was a dangling floral earrings which again is my pattern, but to add beads and hook together which I was so unsure of, I had to seek help from the net. Adding pink bead to it was my boy M suggestion. Sometimes I seek his help for colour combos.

The difficult part in this was to crochet around the beads. If you had gone through my blog, you would have noticed, I hadn't done much with beads. Though I very much love to work with beads and find out new ways to add it in my work, I am afraid of using it when my baby S is around. She is so cheeky nowadays, so I didn't want to take any risk. Everything else can wait, no hurry... 
 
Crochet earrings

At the end of the day, I was so satisfied and happy that I learnt something new and made some earrings too. I had bought some t-shirts for this summer, so making these would complement it.
These are so simple and easy earrings, any one learning crochet can try this.
 
What do you think about these?? Aren't they cute??? Leave your comments, I would love to hear from you. Until next post, bye from Kala. Have a wonderful week ahead.

Thursday 18 August 2016

This time its striped jar jacket !!!

Hello everyone. How are all doing? Today's post is about crocheted striped jar jacket. Its a simple one. Most of my posts are beginners / advanced beginners / intermediate pattern related as I love to keep everything simple, easy and legible. Everyday I learn crochet as its so vast.

So coming back to the post, this jar jacket pattern has only dcs (double crochet stitches) with alternating light shades. As usual with jar bottom extending upwards, it forms a sturdy cover.

Crochet jar jacket

This is another view of the bottle.

Crochet jar jacket


Crocheted jar jacketOnce I was done with this cover, I sensed some emptiness in the jar cover, a plain design. I wanted to add something to it. I was thinking.. thinking.. thinking... I then remembered, I had learnt some time before a leaf pattern from Sheruknitting. I wanted to try that on this jar jacket. Anyways, I had made up mind that this will be used as flower vase for home, so leaf would be apt for this. Also being it in light shades, green colour would suit best too.

So I didn't wait much longer. Took up my hook and started crocheting a sprig which would fit the bottle circumference. Once I had done with that what would you think that I would have done to the leaves??? Cant hear ??? A little bit louder.... What??? Stitched it ??? Thanks for the answers. But I wasn't, honestly, that happy to sit and stitch dearies, because I knew it would be time consuming.

 
Crocheted jar jacket
So stuck the sprig using hot glue, (felt a bit lazy here...).. The sprig was stretchy. So I stretched it to get the exact shape of the leaf.

Again here, I didn't block as leaves wont be so straight. Also I had another thought too. Since I am going to use it as flower vase, I added few assorted buttons which I had in hand, in a circle here and there. I wasn't choosy for the buttons, randomly I selected few colours and fixed it.

And you know what.. It turned out to be much more a lovely jar that I would have crocheted ever.

But later I realised, I was so haste in that. Had I chosen buttons of same colour, then my buttony flowers would have been so beautiful, hadn't it be?? Still no worries. It is my own version.
 

However, isn't that lovely to see the jar??? What do you say?? I couldn't then wait longer to see how the flowers will sit in it. So that day evening I bought a bouquet and placed it in the jar. And my happiness knew no bounds. I felt much proud too. Something had I done which adds beauty to the house. A kala (in Indian language, kala means art) from Kala, huh???

In the evening, when my kids returned from the school and hubby back from office, I asked them how it fits in the hall. They were so happy too and appreciated me (raising collar)....


Now when I remove it to dust the place and be a little late to place it back, I feel that the shelf calls me, beckoning the jar, asking me to put it back... hahahaha.... My illusion?????

Oh, by the way, I had crocheted a flower vase mat for this jar. That will be another post. Now it is already too lengthy. Hope you will enjoy reading it. Until the next post, its Kala signing off..... Bye and please do keep in touch.

Happy crocheting...

Saturday 13 August 2016

MICQ contribution to cancer patients- crocheted hats

Hello all. Welcome to another post in Yarnoments.

This post is dedicated to the effort that MICQ is taking up for the community / charity work. A couple of weeks ago, I have posted about MICQ's contribution to Save UAE Mangroves. This is yet another community / charity project in which MICQ ladies decided to crochet caps for cancer patients. I am extremely happy to be a part of it.


I crocheted a set of 7 caps of size new born to three months. We can donate it locally in the name of MICQ. I am planning to crochet more of these if time permits.

See you on next post. Until then, its bye from Kala. Happy crocheting.

Wednesday 10 August 2016

Crocheted lip balm/lipstick holder keychain

Hello everyone. How is life going?
 
Crocheted lipbalm lipstick holder keychain Here I am so eager for the school to re-open as much as kids are. They are getting bored of being at home all day long. The climate in Glasgow is also not that warm, so can't take them outside too. The daily routine happens as always. However, these factors hasn't affected my crocheting. So many things flash in my mind when I sit to crochet a particular one. So I jot them in my handbook so that I can refer later.

I think it will be fair to share with you what I crocheted for the school exhibition/summer fair. I crocheted some coasters, earrings, keyrings, hairclips, ponytail buns, necklace sets, jar covers etc. I have published few posts on those too.

Today's post is about crocheted lip balm/lipstick holder keychain. This is so easy and simple to make. It is really so cute to look at and also to hold it. It is entirely a beginner project. Any one would love to have it in their handbag. There is nothing much to follow for this one. The picture itself is sufficient to understand the pattern. Once you have mastered the basic stitches, you can make one of this type for yourself.
 
However, feel free to ask me if you would like to have its pattern. I would be more hapy to  help you out. Have a lovely weekend and happy hooking. Bye from Kala.


Thursday 4 August 2016

Granny square earrings

Hello dearies. How are you all doing? Didn't I tell you in one of my previous posts that I am in a hang of making granny squares. It has extended up to making a pair of earrings. Yeah, I tried making a pair of them. I love it. Its too simple. It is definitely a pattern that any beginner can give a try.

Crochet granny square earrings

Style up yourself. Its weightless and goes well with jeans and top. Simple, stylish look.  It doesn't take much time. You can make several pairs in colours of choice and give it to your dear ones too as last minute gifts.

Feel proud of your own pair of earrings and happy when people give that awe-haaa look at you.

Hope you enjoy this post. See you soon in the next post, until then happy crocheting and bye from Kala.

Thursday 28 July 2016

Crochet Indian jhumka / jhimikki

Hi dearies. Welcome to my new post. This post is dedicated to Indian jewellery which we Indian ladies adore much. I love jhimikkis the most (its called jhumkas in North India, but down in South, its jhimikki). Right from my childhood, I have been used to wearing different types of it - kilikoodu kammal, venchaamaram kammal etc.. All which are dangling, especially these types of jhimikkis, I love to wear, at least would like to spend some time watching at it.

Still vacation happening here, so with kids around I am not able to get fully involved in my crochet work. However, I managed to whip up a pair of these crocheted jhimikkis after a long thought of what to do. (uff, I couldn't even think calmly sitting somewhere in the corner as the kids attacks me everytime...  :-) ).

Crochet jhimikki/jhumka


You can wear it along with silk sarees or any traditional outfit, give as gifts to your friends during navaratri etc.

Hope you liked this post. If you ever try this, please share with me your creations. I would love to see it. Also drop in your comments too.

Have a lovely day and weekend ahead. Happy crocheting. Bye from Kala.

Sunday 24 July 2016

Save Mangroves - UAE from MICQ

Hello there everyone. How are you doing??? Its been a long time since I posted something. I was in fact away to India on a vacation. Though I had planned for visiting few temples in India, I didn't expect it will happen so sooner. Clubbed this function and the temple visits and a short vacation in my hometown too.  I was so happy to see all my dear and near whom I have missed a lot.


But you know what, I couldn't keep myself away from crochet then too.

Spent some time on crocheting 10 granny squares of 10"*10" for Save Mangroves - UAE on behalf of MICQ. Glad that I was able to contribute for a noble cause.

There is no Media coverage for this whole project nor there is any individual acknowledgement. Its a pure charity work. The ladies in Umm Al Qwain who do this installation will just post updates on their Facebook page. This is just one of their activities. They do other non-art related activities to collect funds etc.


The specifications for the project were:
  • 20cmx20cm crochet or knitted squares
  • No specific stitches (whatever you want can do)
  • October 5th is last date should be reach UAE.
  • There is no fanfare from this project.
Please visit the link here for more information what this community project is about. In India, the last date for the project was July 15. I hope its not too late if anybody wish to contribute their part for this project. Apologies for the late posting of this information.

As always,, its Kala signing off. Have a lovely week ahead.

Friday 10 June 2016

Granny square cushion cover -1

Hi there everyone. Life is as usual, so is my crochet fever too. This post is about granny square cushion cover. This is for my brother in Trivandrum, the capital city of Kerala (India). He has asked me to make a couple of cushion covers which I have already mentioned somewhere in my previous posts. He liked the granny square blanket I made for the Guinness world record event and wanted me to make it. So I started off with that project.

There is nothing much to explain in this project as this is very similar to any other granny square cushion patterns. But the only change I introduced here was that I chose two different patterns for two sides. I may not be the only soul who would have tried this out, there should be many.

The first side has 9 small squares with additional regular granny rows. The second side is the regular granny square rows itself. I added buttons to lock the fourth side or top side.

Crochet cushion cover

 I think its a good way to introduce buttons in between the stitches. So in that way I avoided the overhead of adding loops or extra chains. Moreover, this cushion cover is a bit larger than the cushion size. So it stretches to a little, thereby giving sufficient room for locking the buttons.

The reason why I chose this pattern is that this pillow can be turned to any side depending upon the mood. It will not showcase the monotonous effect if I had crocheted both sides in the same pattern.

Crochet cushion cover

Secondly, I thought I will get a chance to learn new stitches and new patterns as there are innumerable collections. Only problem is to choose the pattern to learn. :-).

Again this is a very easy, beginner pattern, a very great stash buster and a soothing one. Hope you liked this. Please leave your comments below. Happy crocheting and have a lovely day. Until then its bye from Kala.

Friday 3 June 2016

My first exhibition

Hi there everyone. Hope all are enjoying the warm sunshine in UK, me as well. I am really excited to share you that I was able to showcase my first ever crochet exhibition in my kids' school on Thursday. You would have been known that I was busy preparing for the same last two weeks. To add to my joy is that I was able to raise some fund from my side for the school, Oh isn't that a great cause, charity alone isn't, this type of act do need attention and appreciation, I felt, and I really got it from many, especially from his teachers, head teacher. Awee, I felt so rewarded.

My family supported me a lot, hubby took care of our two cheeky teeny weenies, while my older one helped me collecting and organising the cash in the small storage drawers I had, in spite of standing under the scorching sun. He was also thrilled that his mum has put up a stall and invited his friends and mums to visit me. How sweet of him to voluntarily them, I was amazed of it as he is a very very very shy boy. Hard to make him to talk in front of others.

The fair was from 2.30pm - 5pm. But I went there ahead to setup everything. So for long 3hrs I was under the sun, but I didn't get any time to feel it as I was busy taking care of mine as well as my friend's stall in between who guided me for this. I was feeling delighted to see little kids popping up to me and asking this and that, they were excited to feel the yarn work. Both men and women appreciated me on my work, that was so rewarding. My effort for the fair didn't go waste.

I could take only one photo of the stall. This was taken from the backside, as the pic from the front had shadows of me with sun right above my head. I shall try to blog about the items I had made for the exhibition.  I wasn't so aware of my audience, what would the audience prefer. So I made all sorts from coasters, organisers, jewellery, hair accessories etc. I also made three necklace display stands too, yeah, I didn't know that I can make it. Hope you can see that. I have anyway taken its separate photos, so shall post it as a separate post.


Exhibition
Around 3.30pm I asked my hubby to bring teeny ones to enjoy the bouncy castle which was a part of the fair. They also enjoyed it very much. I think this is the first fair my very little girlie is experiencing ever since she has started walking. I couldn't get time to be with them, but I was able to watch them from my place. It was really fun to see them together in the bouncy castle. Little girl ran to and fro between me and hubby. She almost had upset my table in between this when she was drinking water. Ohhh God, lucky that she didn't spill.

By 4.45pm, I saw other stalls packing up, so I too slowly packed up my things. Kids helped me in packing up things back home. Glad that by the end of the day, everything went well. I was really tired after standing under the sun for three hours. I was really tanned, I could see the colour difference on  my face, hands and neck. Came home and lied down, had dozed for a while, woke up at 7.30pm, freshened up and had my dinner. Again hubby helped me with the chores. And back to bed reading for a while with kids. Oh such a wonderful day I had. Lovelies, see you soon in the next post.


Saturday 28 May 2016

Mesh jar jacket

Hello friends,Crochet mesh jar jacket
In my previous post here about the jar cover, I told you I wish to make few more jar covers. So this time I tried to make a mesh jar jacket. .

This is so simple as the earlier post, so straightforward. This is an apt project for beginners too. On viewing the picture, itself, one can write their own pattern. There may be different approaches for this pattern, however this is how I made this. It includes a flat circle base, dcs and picots. All made to give the jar a simple but attractive look.

Crochet mesh jar jacket
Its so simple and adorable. You can use this in kitchen/table/stationery/vase... If you wish to add any embellishments, you can add buttons, crochet flowers, beads or anything of your choice. I prefer to leave it as such.
Hope you liked this post. Also share your project if you make one in my blog. I would love to see yours too.

So have a happy crocheting, until then bye from Kala.

Friday 20 May 2016

The most awaited table cloth.

Hello there everyone. Hope everything is as usual. Mine is the same, however, I am investing  more time to crochet or is it just a feeling, I don't know.

This post is going to be one of my dearest posts in my life, I should say. Why?? Can you give a wild guess?? Yeah. you got it. This post is about my most awaited table cloth. Remember my post how I got into this project, how I developed a pattern for it by myself. If you haven't been to that, don't worry. You can read it here.

Finally I am done with all finishing touches for the table cloth. I would like to thank Kate for giving me sound advise on how to block the table cloth. Hey, Kate is absolutely amazing. I accidentally got an information about blocking from her site. Though there are many in the internet, videos etc, I found Kate's method of explanation so easier. I emailed her and to my surprise, she instantly responded with few tips too. I promised her that I will let her know the status of my table cloth once it is done. Kate too has a blog called http://signedwithanowl.blogspot.com/. If you haven't been to her blog, please pop in. It is definitely a value add to your knowledge. Kate, once again, many thanks for guiding me. Hope you see my finished work and drop your suggestions. After going through her inputs, I like to block every project of mine. It does change the look of the project. So dignified....

This is how my table cloth now looks like, a demo on my dining table.


tablecloth
 
A close up of the table cloth pattern below.
 
tablecloth

Doesn't the table cloth majestically lie on the dining table. I am in awe of it. Really feel so proud about myself that within a short span of experience in crochet, I got to design my own pattern. Thanking my friend for giving me this opportunity. Kids are asking me to crochet a tablecloth for us. :-). Glad that they liked the outcome. However, it was really difficult for me to manage them as I had laid it on the carpet in their playroom. I had to be always behind my LOs, as I feared they will pull out the needles, and they did it too when I was away from their sight. :-). Also the climate was so cold - rainy all the time, hardly any sunshine. So it took more days to get dried, up to my satisfaction.

Now this needs to carefully wrapped and posted to her when I go to India. So friends, hope you all like this. Please share your suggestions as usual. Have a lovely evening and weekend. Its Kala signing off until I come back with a new post.

Tuesday 17 May 2016

Granny round jar cover

Hi friends,

Didn't I tell you in my previous post that I got a hang of doing some granny squares and jumped into something that I really didn't expect to do so? Well, did you read my mind what I made ??? Yeah, you are right. I made a granny round jar cover. I couldn't call it granny square, as the pattern though is granny square, its for round jam bottle. So calling it Granny round jar cover. Excuse me for that...


There were some jam bottles lying in the kitchen which I have reserved for later use. Always it will be useful to store some bits and bobs in home, especially if there are toddlers.. :-).

So when I was thinking of making something out of granny square, an idea struck me why not I try to make a jar cover. And then I didn't wait for anything else, just sat down and started crocheting.

But I was stuck with making the rounds taller. Hey, how do I do it ??? I kinda was wondering how to increase the rounds to the lengthwise.. I was totally lost in that excitement, but then figured out that I just need to avoid the corner clusters and go in round and round with the regular clusters and spaces after few trials.

How silly was that I got stuck there!!!


 Then my rounds got increasing lengthwise. I don't always pattern any colour palette. Just pick up random colours as I go crocheting, ensuring that the colours blend with each other.

Every alternating row has dark / bright colour or sometimes have a good colour combo.

Then I added an edging also to that granny round cover. I felt like the jar cover was loose at the top around the neck of the bottle. So didn't think much, made a long chain and then tied a bow to the neck.... Bow suits to neck, though.


See how cosily does the cover snugs to the jar, doesn't it???  You know what, It hardly took an evening time for me to make this project and its really inspiring that you would definitely want to sit and do more and more.

This pattern is really a stash buster too. I think of making some more and contributing to the upcoming summer fair in my kids' school.


Hope you all liked my post. Please share your comments, also would like to know about my pattern if it was legible. Until then happy crocheting and bye from Kala.

Thursday 12 May 2016

Sharing CAL Calendar 2016

Good morning friends...

I was browsing through my readers blog that I noticed this CAL calendar 2016 from Sangeetha''s blog. Its really a treasure for us, crocheters. So thought of sharing this to you all. It will help you plan your schedule too if you hadn't made any.


I felt like choosing a mandala. I hadn't made any other than a stool cover. Can this be called a mandala, I don't know? I also don't recall which site I referred to making this. If I remember well, there is a dog named Raymond in that site. Excuse me for my poor memory recalling the site name.( I love dogs, and there was an Indian ad which refers to suitings named Raymond, so I linked both.)

This stool cover was made last year April Easter holidays, that I remember well as just after the holidays, I was hospitalized for few days due to a lump developed around my left side of neck... Just remembered those dayssss....

Sorry, a diversion from the post. :-)...

So where were we, yeah, CAL. Please have a look at this calendar.
Sangeetha has some more information too. Sharing her link too below if its useful for you.
http://www.crochetkari.com/2016/05/the-ultimate-crochet-calendar.html.

Have lovely day and crocheting. See you soon, until then its bye from  Kala.

Wednesday 11 May 2016

Granny square side table mat


Hi there, how all are doing??? I am so happy that its so sunny here in Glasgow this week. Everything is so colourful outside. Hope this lasts for few more days as the weather here is really unpredictable.


As mentioned in my previous post, this is the granny square that I made for my side table. Its pretty straight forward one. A floral center using dc clusters made out of magic ring and granny clusters all in dcs. I like making centers using magic ring rather than the chains as for some reason the chains doesn't work well for me. I used JAYGO method to join the granny squares.

My intention was to make a cover type, then I decided to make it as a mat type, so that I can wash it whenever needed. If it was a cover type, covering the sides, I feared on every removal, it might lose its tension.


This is how it looks like in my living/dining room. It just snugs in the corner behind the door. Did you spot a mistake that I made in the border? I noted the mistake while blocking this. There is an extra dc, I think that is the reason, to the corner of each granny square which caused my granny mat to ruffle. I was wondering why I wasn't able to straighten the middle portion during blocking.

Upon closely watching, I noted this mistake. There should be only one set of three dcs in which the middle stitch is a dctog (hope you understood what I meant). Instead of this I had continuously used two set of three dcs in each corner of the granny square.

So this point I have noted for my future projects to be taken care of.

Additionally, I could add tassels for this mat, but I have reserved it for my next project, which is half done. I need to join the squares and add borders to it. In the meantime, I have jumped to some other home décor project which was really unexpected for me. I shall share it sooner.

Another point I noted when taking these photos is poor lighting. I think its high time too switch over to a HD camera. Maybe that also plays a vital role apart from the natural lighting. Here in Glasgow, we get very less sunshine. Mostly, its grey .... So a request in pipeline to my hubby, yeah, I found a reason....

As usual, please leave your comments. I wold love to know from you. until then bye from Kala.