Good morning everyone. Today's post is different from usual crochet stuff. Its about my necklace / jewellery display stand which I made for my first exhibition happened in the summer in my kids' school. I have promised to post about this, but I was away on vacation and I couldn't do so then.
This is the display stand that I made. It showcased very well my jewelleries in the exhibition. I can't claim this as my own idea as I got influenced by a couple of youtube videos, but I made few variations to that as I didn't have much of the essentials in hand then. But I can assure that this will add charm to your own dressing up table or for the exhibition purposes.
I am sharing my idea here, if in case it is useful for you. Please don't be afraid seeing the lengthy post. Its a step by step procedure that I have explained here. You can make it in a single evening time.
Essentials:
Card board of dimensions 10"*7".
White paper
Pencil / pen, eraser
Ruler
Colour paper / gift wrap cover of dimensions 11"* 8"
Glue
Punching machine (single punch or double punch)
Thick thread / yarn
Scissors
Method:
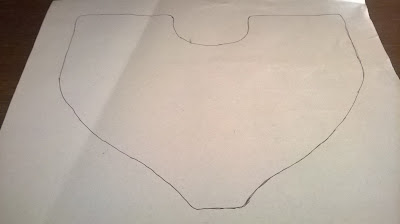
1. In the white paper, draw a U neck shape as below or any shape you prefer. This is my U neck shape.
2. Cut it along the drawing so that you get the shape of the U neck. Place it on the cardboard and trace it in the card board.
3. Cut the cardboard according to the design.
4. Place the colour paper / gift wrap paper on the top of the cardboard neck to check for the proper fit.
5. Using glue, stick the paper on the cardboard and trim of excess paper.
6. Its time to mark holes using pen / pencil. So using ruler, measure the width of left side of the U neck. Now make 4 or 5 holes according to the width in the left side. I made 4 holes.
7. Now using the punching machine make holes to the left side of the U neck on the top of the holes you drew using pencil.
8. Repeat the same process (6 &7) for the right side. You will get your U neck as in the picture below.
9. This is the neck shape I have obtained so far. Yours will be different if you have designed a different one., but overall process will be the same if you have followed these instructions.
10. Now its time to thread or yarn through the holes. For that , fold the neck by placing right side on top of left or vice versa in such a way that the holes overlap on top of the other, so that you see a single hole. If there is a minor difference between the distances of the holes you made, you can ignore it.
11. Pull in and out the yarn alternatively through the holes. I pulled out the yarn from the inside of the first hole of U neck to outside, pulled in through the second hole to the inside alternating until I reach the last hole. So you will get the thread/yarn seen outside as in the picture below.
12.In the inside of the neck, tie a knot so secure it as in the following picture.
13. Ta-daaaahhhh !!! Your necklace / jewellery display stand is ready to use. This is the front view.
You can showcase your jewellery on the stand in your dressing table or any where.
Tips:
1. You can draw it in the cardboard itself, if you want to. In that way, you can save time.
2. Make sure that the holes are placed in correct spacing on either side of the neck.
3. You can cover the neck shape in two different colours - one at the front and one at the back for a variety look (see my step by step pictures) or use the same colour on both sides, its up to your wish.
4. The advantage of this is that you can either stack it or unfold it, make it flat and place it in your suitcase as you place your notebooks one top the other.
5. To add more chic look, you can cover the top and bottom of the neck, but in that case you wont be able to stack or unfold it.
I hope you enjoyed reading my post. If you ever make one, please post your picture. I would love to see it. Please leave your comments as always. Until then, its bye from Kala.
Note: I am relocating to Leeds, so please expect a delay in my posts for next couple of weeks.


No comments:
Post a Comment