Monday, 29 August 2016

DIY - Necklace/jewellery display stand

Good morning everyone. Today's post is different from usual crochet stuff. Its about my necklace / jewellery display stand which I made for my first exhibition happened in the summer in my kids' school. I have promised to post about this, but I was away on vacation and I couldn't do so then.

This is the display stand that I made. It showcased very well my jewelleries in the exhibition. I can't claim this as my own idea as I got influenced by a couple of youtube videos, but I made few variations to that as I didn't have much of the essentials in hand then. But I can assure that this will add charm to your own dressing up table or for the exhibition purposes.


I am sharing my idea here, if in case it is useful for you. Please don't be afraid seeing the lengthy post. Its a step by step procedure that I have explained here. You can make it in a single evening time.

Essentials:

Card board of dimensions 10"*7".
White paper
Pencil / pen, eraser
Ruler
Colour paper / gift wrap cover of dimensions 11"* 8"
Glue
Punching machine (single punch or double punch)
Thick thread / yarn
Scissors

Method:

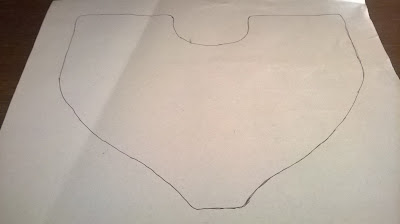
1. In the white paper, draw a U neck shape as below or any shape you prefer. This is my U neck shape.

DIY - Necklace/jewellery display stand

2. Cut it along the drawing so that you get the shape of the U neck. Place it on the cardboard and trace it in the card board.

3. Cut the cardboard according to the design.

4. Place the colour paper / gift wrap paper on the top of the cardboard neck to check for the proper fit.

5. Using glue, stick the paper on the cardboard and trim of excess paper.

6. Its time to mark holes using pen / pencil. So using ruler, measure the width of left side of the U neck. Now make 4 or 5 holes according to the width in the left side. I made 4 holes.

7. Now using the punching machine make holes to the left side of the U neck on the top of the holes you drew using pencil.

8. Repeat the same process (6 &7) for the right side. You will get your U neck as in the picture below.


DIY - Necklace/jewellery display stand

9. This is the neck shape I have obtained so far. Yours will be different if you have designed a different one., but overall process will be the same if you have followed these instructions.

DIY - Necklace/jewellery display stand

10. Now its time to thread or yarn through the holes.  For that , fold the neck by placing right side on top of left or vice versa in such a way that the holes overlap on top of the other, so that you see a single hole. If there is a minor difference between the distances of the holes you made, you can ignore it.

11. Pull in and out the yarn alternatively through the holes. I pulled out the yarn from the inside of the first hole of U neck to outside, pulled in through the second hole to the inside alternating until I reach the last hole. So you will get the thread/yarn seen outside as in the picture below.

DIY - Necklace/jewellery display stand

12.In the inside of the neck, tie a knot so secure it as in the following picture.

DIY - Necklace/jewellery display stand

13. Ta-daaaahhhh !!! Your necklace / jewellery display stand is ready to use. This is the front view.

DIY - Necklace/jewellery display stand

You can showcase your jewellery on the stand in your dressing table or any where.


DIY - Necklace/jewellery display stand

Tips:

1. You can draw it in the cardboard itself, if you want to. In that way, you can save time.

2. Make sure that the holes are placed in correct spacing on either side of the neck.

3. You can cover the neck shape in two different colours - one at the front and one at the back for a variety look (see my step by step pictures) or use the same colour on both sides, its up to your wish.

4. The advantage of this is that you can either stack it or unfold it, make it flat and place it in your suitcase as you place your notebooks one top the other.

5. To add more chic look, you can cover the top and bottom of the neck, but in that case you wont be able to stack or unfold it.

I hope you enjoyed reading my post. If you ever make one, please post your picture. I would love to see it. Please leave your comments as always. Until then, its bye from Kala.

Note: I am relocating to Leeds, so please expect a delay in my posts for next couple of weeks.

Sunday, 21 August 2016

Floral earrings

It was so grey and rainy yesterday. I sat down on my sofa after the household chores wondering what can be done. I started learning something new in crochet, but continuous working on it bored me. Seeing the same colour for some time had almost put me to sleep. The climate was also favourable. No no no... I don't want to sleep. Then I thought of making something easy, but diverting. So earrings came to my rescue. I made two pairs of earrings on a single go which was unintentional, but it was so addictive.
 
This was the first one I made out of yellow crochet cotton thread and 1.75mm hook. I didn't have much idea that I foresaw to make. It happened so. I loved the colour combo - yellow and pink. Oh I really loved the outcome. I didn't need to iron it as it was stiff by itself. I just needed to try it on. The rhinestones as well as the pink beads go well with each other.
 
Crochet earrings

I didn't follow any pattern for these two, so I can claim its my version, but net provides more options. However, the second one I made was a dangling floral earrings which again is my pattern, but to add beads and hook together which I was so unsure of, I had to seek help from the net. Adding pink bead to it was my boy M suggestion. Sometimes I seek his help for colour combos.

The difficult part in this was to crochet around the beads. If you had gone through my blog, you would have noticed, I hadn't done much with beads. Though I very much love to work with beads and find out new ways to add it in my work, I am afraid of using it when my baby S is around. She is so cheeky nowadays, so I didn't want to take any risk. Everything else can wait, no hurry... 
 
Crochet earrings

At the end of the day, I was so satisfied and happy that I learnt something new and made some earrings too. I had bought some t-shirts for this summer, so making these would complement it.
These are so simple and easy earrings, any one learning crochet can try this.
 
What do you think about these?? Aren't they cute??? Leave your comments, I would love to hear from you. Until next post, bye from Kala. Have a wonderful week ahead.

Thursday, 18 August 2016

This time its striped jar jacket !!!

Hello everyone. How are all doing? Today's post is about crocheted striped jar jacket. Its a simple one. Most of my posts are beginners / advanced beginners / intermediate pattern related as I love to keep everything simple, easy and legible. Everyday I learn crochet as its so vast.

So coming back to the post, this jar jacket pattern has only dcs (double crochet stitches) with alternating light shades. As usual with jar bottom extending upwards, it forms a sturdy cover.

Crochet jar jacket

This is another view of the bottle.

Crochet jar jacket


Crocheted jar jacketOnce I was done with this cover, I sensed some emptiness in the jar cover, a plain design. I wanted to add something to it. I was thinking.. thinking.. thinking... I then remembered, I had learnt some time before a leaf pattern from Sheruknitting. I wanted to try that on this jar jacket. Anyways, I had made up mind that this will be used as flower vase for home, so leaf would be apt for this. Also being it in light shades, green colour would suit best too.

So I didn't wait much longer. Took up my hook and started crocheting a sprig which would fit the bottle circumference. Once I had done with that what would you think that I would have done to the leaves??? Cant hear ??? A little bit louder.... What??? Stitched it ??? Thanks for the answers. But I wasn't, honestly, that happy to sit and stitch dearies, because I knew it would be time consuming.

 
Crocheted jar jacket
So stuck the sprig using hot glue, (felt a bit lazy here...).. The sprig was stretchy. So I stretched it to get the exact shape of the leaf.

Again here, I didn't block as leaves wont be so straight. Also I had another thought too. Since I am going to use it as flower vase, I added few assorted buttons which I had in hand, in a circle here and there. I wasn't choosy for the buttons, randomly I selected few colours and fixed it.

And you know what.. It turned out to be much more a lovely jar that I would have crocheted ever.

But later I realised, I was so haste in that. Had I chosen buttons of same colour, then my buttony flowers would have been so beautiful, hadn't it be?? Still no worries. It is my own version.
 

However, isn't that lovely to see the jar??? What do you say?? I couldn't then wait longer to see how the flowers will sit in it. So that day evening I bought a bouquet and placed it in the jar. And my happiness knew no bounds. I felt much proud too. Something had I done which adds beauty to the house. A kala (in Indian language, kala means art) from Kala, huh???

In the evening, when my kids returned from the school and hubby back from office, I asked them how it fits in the hall. They were so happy too and appreciated me (raising collar)....


Now when I remove it to dust the place and be a little late to place it back, I feel that the shelf calls me, beckoning the jar, asking me to put it back... hahahaha.... My illusion?????

Oh, by the way, I had crocheted a flower vase mat for this jar. That will be another post. Now it is already too lengthy. Hope you will enjoy reading it. Until the next post, its Kala signing off..... Bye and please do keep in touch.

Happy crocheting...

Saturday, 13 August 2016

MICQ contribution to cancer patients- crocheted hats

Hello all. Welcome to another post in Yarnoments.

This post is dedicated to the effort that MICQ is taking up for the community / charity work. A couple of weeks ago, I have posted about MICQ's contribution to Save UAE Mangroves. This is yet another community / charity project in which MICQ ladies decided to crochet caps for cancer patients. I am extremely happy to be a part of it.


I crocheted a set of 7 caps of size new born to three months. We can donate it locally in the name of MICQ. I am planning to crochet more of these if time permits.

See you on next post. Until then, its bye from Kala. Happy crocheting.

Wednesday, 10 August 2016

Crocheted lip balm/lipstick holder keychain

Hello everyone. How is life going?
 
Crocheted lipbalm lipstick holder keychain Here I am so eager for the school to re-open as much as kids are. They are getting bored of being at home all day long. The climate in Glasgow is also not that warm, so can't take them outside too. The daily routine happens as always. However, these factors hasn't affected my crocheting. So many things flash in my mind when I sit to crochet a particular one. So I jot them in my handbook so that I can refer later.

I think it will be fair to share with you what I crocheted for the school exhibition/summer fair. I crocheted some coasters, earrings, keyrings, hairclips, ponytail buns, necklace sets, jar covers etc. I have published few posts on those too.

Today's post is about crocheted lip balm/lipstick holder keychain. This is so easy and simple to make. It is really so cute to look at and also to hold it. It is entirely a beginner project. Any one would love to have it in their handbag. There is nothing much to follow for this one. The picture itself is sufficient to understand the pattern. Once you have mastered the basic stitches, you can make one of this type for yourself.
 
However, feel free to ask me if you would like to have its pattern. I would be more hapy to  help you out. Have a lovely weekend and happy hooking. Bye from Kala.


Thursday, 4 August 2016

Granny square earrings

Hello dearies. How are you all doing? Didn't I tell you in one of my previous posts that I am in a hang of making granny squares. It has extended up to making a pair of earrings. Yeah, I tried making a pair of them. I love it. Its too simple. It is definitely a pattern that any beginner can give a try.

Crochet granny square earrings

Style up yourself. Its weightless and goes well with jeans and top. Simple, stylish look.  It doesn't take much time. You can make several pairs in colours of choice and give it to your dear ones too as last minute gifts.

Feel proud of your own pair of earrings and happy when people give that awe-haaa look at you.

Hope you enjoy this post. See you soon in the next post, until then happy crocheting and bye from Kala.